TechSmith ®
TechSmith ®

Edit Zoom Recordings

Bring your Zoom recording into Camtasia Editor to remove unwanted sections, fix audio, and add polish so that it is ready to share.

Camtasia product icon
 

Camtasia Editor makes it simple to turn your meetings, webinars, and training sessions into polished, professional videos.

  • Edit with Precision: Easily cut out mistakes, long pauses, or off-topic conversations from your meeting.
  • Enhance Audio: Clean up background noise, normalize volume, and ensure your message is clear.
  • Highlight Key Info: Use Camtasia Editor’s animations to zoom in on important parts of your screen share. Add annotations, callouts, and text to provide context.
  • Protect Privacy: Use blurs or shapes to hide sensitive information or attendee faces.
  • Add Professional Polish: Add a branded intro/outro, lower-thirds, titles, or background music.

Once your edits are complete, you can easily save your video as a local file (MP4) or send it directly to popular destinations like YouTube and Screencast.

Import a Zoom Cloud Recording

Note: The Camtasia Editor Zoom integration can only access Zoom cloud recordings where you were the meeting host. To import other Zoom recordings, see Edit Microsoft Teams & Other Meeting Recordings.

  1. Open Camtasia Editor.
  2. In a new or open project, select File > Import > Zoom.
  3. In the Import from Zoom dialog, click Sign In.
  4. Enter your email address and password for Zoom and click Sign In.
  5. On the permissions page, enable the Allow this app to use my shared access permissions checkbox (optional) and click Allow.
    Zoom integration permission dialog
  6. Camtasia Editor connects to your Zoom cloud recordings. You can search by date, topic, or meeting ID to find and import your Zoom cloud recordings.
  7. Click to select the Zoom recording and select one of the following import options:
    • Open in Rev: Opens the recording in Camtasia Rev where you can apply one of our professionally-designed layouts to best fit your recorded content before editing. To learn more, see Apply a Layout in Camtasia Rev.
    • Import Media: Opens the recording on the timeline to start editing.

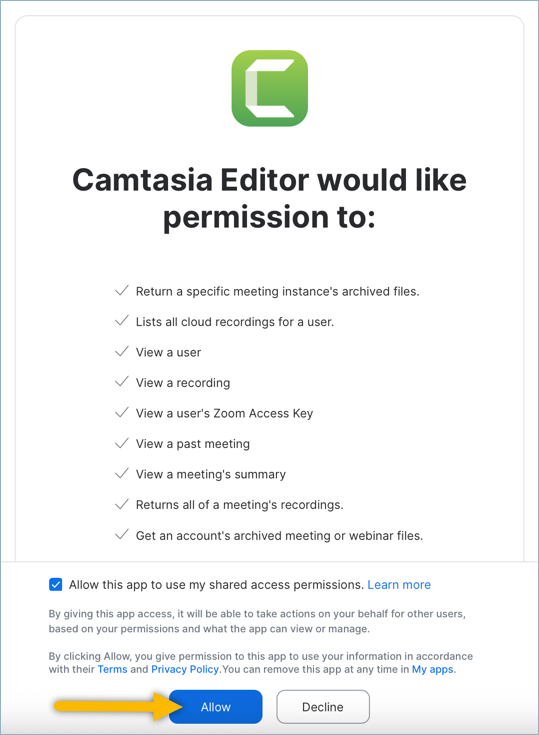
Note: To learn how to disconnect or remove the Camtasia Editor Zoom app, see Access Your Zoom Cloud Recordings in Camtasia Editor.

Apply a Layout in Camtasia Rev

If you selected the Open in Rev import option, you can apply one of our professionally-designed layouts to best fit your recorded content before editing.

Note: For best results, it is recommended to change your Zoom settings before recording to record the active speaker, gallery video, and shared screen separately. To learn how to change these settings in Zoom, see Recommended Settings for Zoom Recordings.

Camtasia Rev

  • Look and Layout tabs: Select one of our professionally-designed layouts. Click See All to show more. Choose between screen-focused, balanced, or camera-focused layouts.
  • Background tab: Choose from a variety of colors, patterns, and animations for the background to make your content more visually engaging.
  • Screen and Camera tabs: Click to turn on or off effects that apply to the screen or camera video.
  • Filter tab: Choose from a variety of color filters to apply to your camera video.

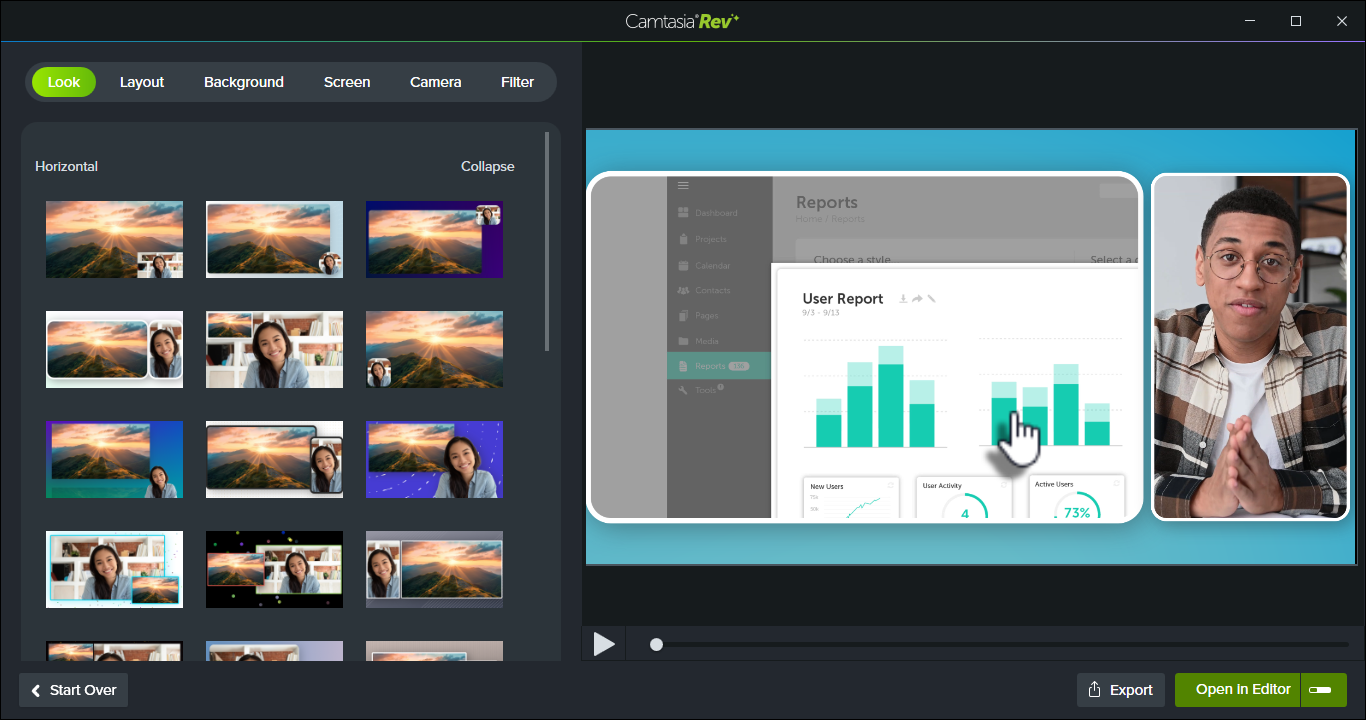
After you have selected the desired look, click Open in Editor to continue editing and adding enhancements to your video. See Common Edits.

If you want to change any of your selections at a later time, click the Modify button on the media to open Camtasia Rev and make your changes. See Introduction to Rev Media.
Modify button

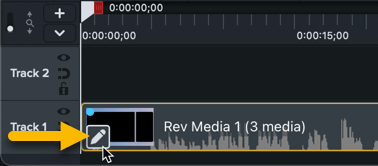
Tip: Apply different layouts throughout the recording to change the focus.

  1. Click Open in Editor to send the recording to Camtasia Editor.
  2. On the timeline, drag the playhead to the location where you want the new layout to start.
  3. Click the Split button.
  4. Click the Modify button on the split media.
  5. Edit the layout in Rev and click Save.

Common Edits

Camtasia Editor makes it simple to turn your meetings, webinars, and training sessions into polished, professional videos. Try some of these common edits for meeting recordings:

Trim the Start and End

Trim out the wait time or conversations recorded before the Zoom call content begins.

Click and drag the ends of a clip to easily remove or restore footage. 

Remove Sections with Text-Based Editing

Quickly identify sections to remove to streamline your content, such as set up, distractions, irrelevant conversation, etc. Camtasia Audiate transcribes your audio into plain text, making any issues easy to spot and remove. Delete words, mistakes, or sections of your video.

The edits are automatically synced to your Camtasia Editor project. This speeds up the editing process instead of having to play back audio in longer recordings.

 
  1. In Camtasia Editor, click to select the media on the timeline.
  2. Click the Edit as Text button.
  3. Camtasia Audiate opens. Select your display preference and click Import. Smart scenes are great for dividing your content into smaller sections for quick scanning.
  4. Camtasia Audiate transcribes the audio on the timeline. Click and drag to select the section to delete and press the Delete key. To delete an entire scene, click the scene number dropdown and select Delete Scene.
  5. Click the Sync button to send the update back to your Camtasia Editor project.

Remove Ums and Ahs

Camtasia Audiate automatically recognizes filler words, such as “Ums” or repeated words, and pauses in speech. Click the Suggested Edits dropdown in the upper-left corner to automatically apply the recommended edits to these filler words and pauses.

 
  1. In Camtasia Editor, click to select the media on the timeline.
  2. Click the Edit as Text button.
  3. Camtasia Audiate opens. Select your display preference and click Import.
  4. Camtasia Audiate transcribes the audio on the timeline. Click the Suggested Edits dropdown and select an option.
  5. Click the Sync button to send the update back to your Camtasia Editor project.

See Edit Audio & Mistakes.

Adjust Audio Levels

Add audio points to adjust the volume for a part of the Zoom recording. Use this for sections where a speaker has too low or high audio levels.

Note: If you imported the recording into Rev, you must first unpack the Rev media to edit the audio points. Right-click the media on the timeline and select Unpack Rev Media. Do not unpack Rev media if you still have edits to make in Camtasia Rev.

 
  1. Click to select the audio on the timeline.
  2. In the Properties, select the Audio tab.
  3. On the audio clip, double-click to add an audio point.
  4. Drag an audio point or line between audio points to raise or lower the volume.

See Edit Audio.

Tip: Save time editing with variable speed shortcuts.

  • Press J to reverse the timeline playback at normal (1x), 2x, 4x, or 8x speed.
  • Press K to pause the timeline playback.
  • Press L to play the timeline forward at normal (1x), 2x, 4x, or 8x speed.

Add an Intro or Outro

Add a branded intro/outro, lower-thirds, titles, or background music from the Camtasia Assets.

Titles in Camtasia Assets subtab

To use one of Camtasia’s premade titles for your intro or outro:

  1. Select the Media tab > Camtasia Assets subtab > Titles > See All.
  2. Browse or search for a Title asset.
  3. To add an asset to your video, drag the asset from the Camtasia Assets subtab onto the desired location on the timeline or canvas.
  4. To customize the title, click the Properties button. Each asset has its own unique set of customizable properties, such as color, size, text, and speed. Edit the desired properties for each.

To learn more about Camtasia Asssets, see Enhance Your Video with Camtasia Assets.

Add Annotations

Provide context or call attention to important parts in the recording by adding annotations, text, or callouts. Use shapes or blurs to hide sensitive information, such as attendee names.

 
  1. In Camtasia Editor, click the Annotations tab.
  2. Click a subtab to browse the annotations available for each type.
  3. In the Style dropdown, select All to view all annotations.
  4. Drag the annotation onto the timeline or canvas.

See Add Arrows, Shapes, & Callouts.

Generate Captions

Save time and automatically generate closed or dynamic captions based on the audio transcription. See Add Closed Captions or Add Dynamic Captions.

Share Your Recording

Export menu

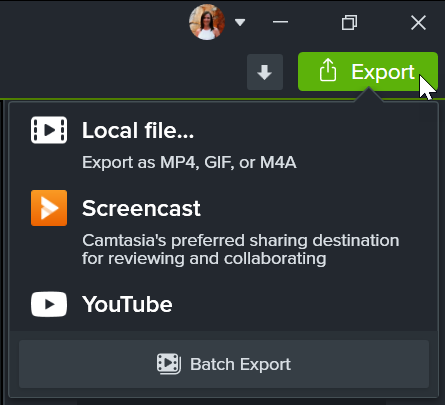
To share your edited Zoom recording, click Export and select the option that works best for you.

Select Local File to save to your computer or share to another destination like YouTube.

See Export & Share Your Video.

Before recording a Zoom meeting, it is recommend to select the following settings to provide the most flexible editing options in Camtasia Editor:

In your Zoom account, select Settings > Recording > General tab.
Zoom Settings and Recording and General tabs selected

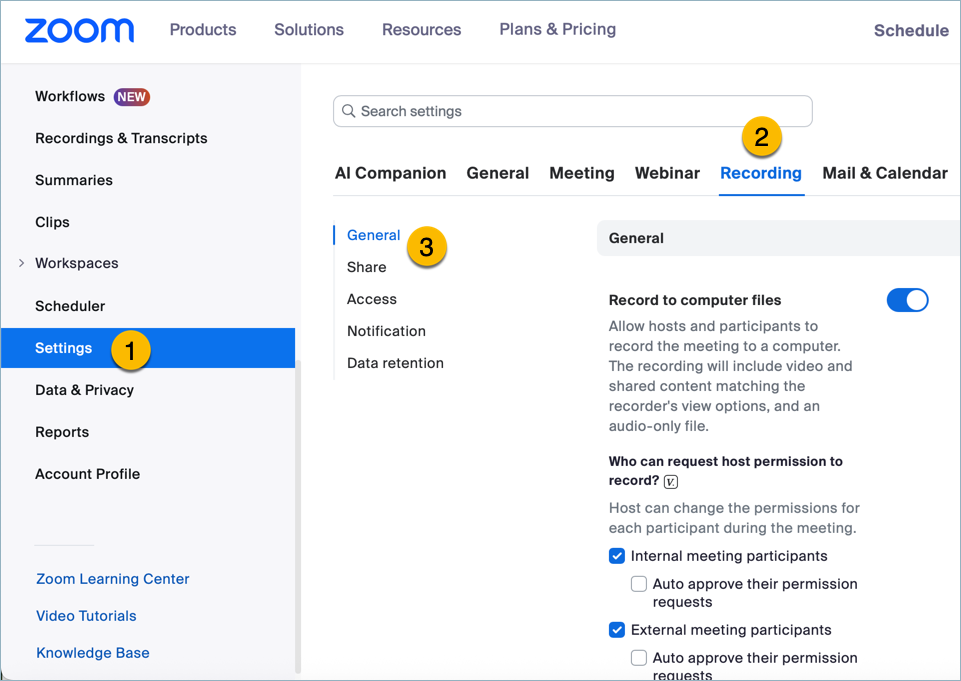
In the Cloud recording setting section, enable the Record active speaker, gallery view and shared screen separately checkbox and click Save.
Record active speaker, gallery view and shared screen separately option selected in Zoom settings

Camtasia Icon Logo

Get Camtasia

Unleash the world’s most powerful screen recorder and video editor.

* Already a Camtasia Editor user? Learn how to update to the latest version.

All Camtasia Tutorials